Jubilee Tart
Posted: March 3, 2022 Filed under: Desserts, Pastry, Puff Pastry, Shortcrust | Tags: berries, fresh, fruit, pastry, puff, shortcrust, tart 5 Comments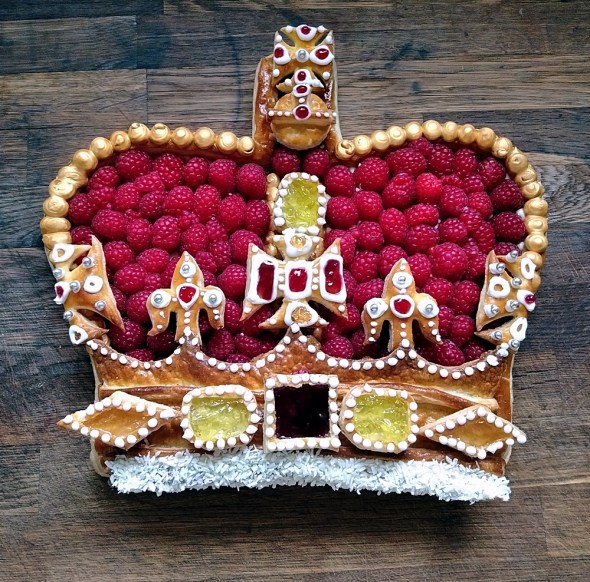
Wotchers!
This was my entry in the Fortnums & Mason Platinum Jubilee competition to create a pudding to celebrate Queen Elizabeth’s Platinum Jubilee.
It didn’t make the cut, but I’m posting it here anyway so you can taste what The Queen is missing out on!
There were several guidelines and advice for consideration, so here’s my reasoning for each point:
- It Tastes Just Right. Fresh clean flavours, executed well. Berries for freshness, a rich chocolate cream, crisp puff pastry and crumbly flaky pastry with adash of raspberry jam.
- Perfect for Home Bakers: Your pudding needs to be easy enough for people everywhere to recreate at home. I spent a lot of time considering this and the adaptations that could be made, whatever the skill of the baker. My choices were as follows. An open, fresh fruit tart is within everyone’s grasp. The pastries can be bought, the filling switched for either cream or custard if liked, and the fruit can be any as long as they ‘match’ with the jam. And that is the basis of the tart. Everything else is just bells and whistles.
- A Memorable Story:A good pudding is made with passion and pride, so we’d love to hear the story behind your entry. I chose to make the tart in the shape of St Edward’s crown for several reasons:
- It is the crown which was used in The Queen’s Coronation.
- As such it is a symbol of her reign.
- It is also a symbol of the monarchy in the UK for almost 1000 years (although the original was destroyed in 1649).
- The Queen added it to her royal coat of arms as the emblem of the UK, and as a result we see it daily, across the realm, on royal badges, insignia, letter boxes and passports.
- Fit for The Queen:The proof of the pudding may be in the eating, but this one will be served to The Queen, so it needs to look the part. The decorations I made were puff pastry ‘jewels’ in the form of vol au vents and royal icing, filled with sieved jam/jellies, a few silver balls and some edible gold paint. The decorations could just as easily be made using sweeties.
Jubilee Tart
Have the following assembled:
- Shortcrust pastry: I used my favourite Cornflour Shortcrust. You can find it here. You can also buy it if you prefer. A block is better as you’ll want to roll it out rather thicker than the ready rolled.
- Puff Pastry: Use a ready made block, not ready rolled.
- Seedless Raspberry Jam. Or any seedless/sieved jam to ‘match’ your berries.
- Namelaka cream: with white chocolate, which goes well with raspberries.
- fresh berries – I chose raspberries because their soft, downy appearance reminds me of the velvet inside the crown, but blackberries, blueberries, strawberries, etc. are all equally good choices.
- Decorations: more jams/jellies for the ‘jewels, royal icing, silver balls, sugar crystals, whatever takes your fancy.
I thought I’d do a bit of a step-by-step method to demonstrate how to approach this tart, because what I’d really like you to take away from this is the know-how for constructing your own freestyle tarts. Don’t be limited by the tins in your cupboard – break free your creativity and come up with your own shapes!
- Once you’ve made your shortcrust pastry, immediately roll it out to about 5mm thickness. Dock the pastry (poke holes) all over, cover with cling film and put into the fridge to chill. Let it rest for at least 30 minutes.
- Roll out your block of puff pastry to a thickness of 1cm. The puff pastry will be used to make the sides of the tart, so they need to be on the thicker side. Cover the pastry with cling film and allow it to rest in the fridge for at least 30 minutes. You want to be sure it’s not going to shrink during baking, which is what happens if it is not fully rested after rolling out.
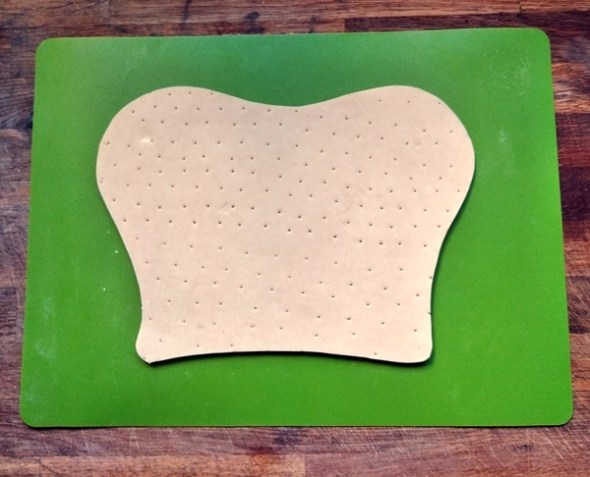 When both pastries have chilled, remove them from the fridge. Cut out your crown shape from the shortcrust pastry.
 Cut strips of puff pastry 1.5cm wide. Dampen the edges of the shortcrust and lay the strips of puff pastry around the edge of the crown shape, to make the tart walls. Cross-hatch the ends of the strips and blend so that they join together with no gaps.
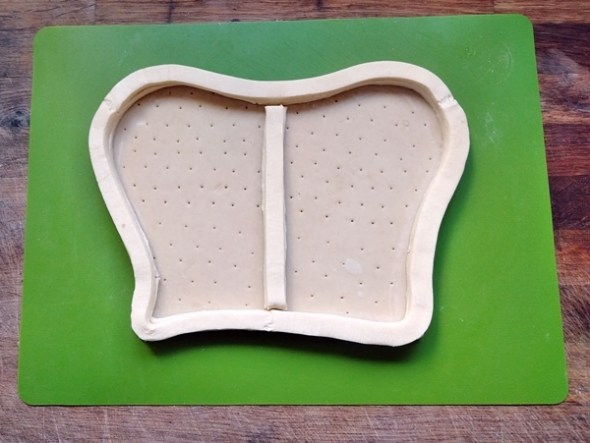
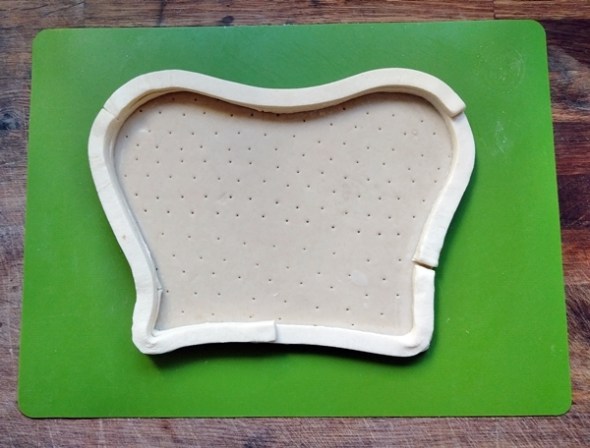 Dampen the top of the puff pastry with water and add a second layer of puff pastry strips. Stagger the start to ensure your strips start and end in different places to the first layer. Notice the blended ends of each strip have no gaps.
- Add a double-height of puff pastry down the middle – or not, you decide – but it makes portioning the tart neater and gives you something upon which to lay the decorations. Chill in the fridge for 30 minutes.

- Heat the oven to 205°C/185°C Fan. Remove the pastry from the fridge and brush the tops of the puff pastry with beaten egg to glaze. You can use yolk only, if you like, but it does go rather too dark for my tastes, and we want the cooked pastry to be golden.
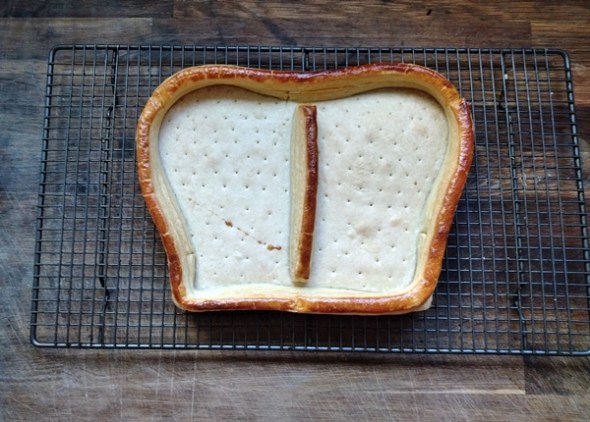
- Transfer to a baking sheet and bake until puffed and golden brown, 25-30 minutes. Cool on a wire rack.
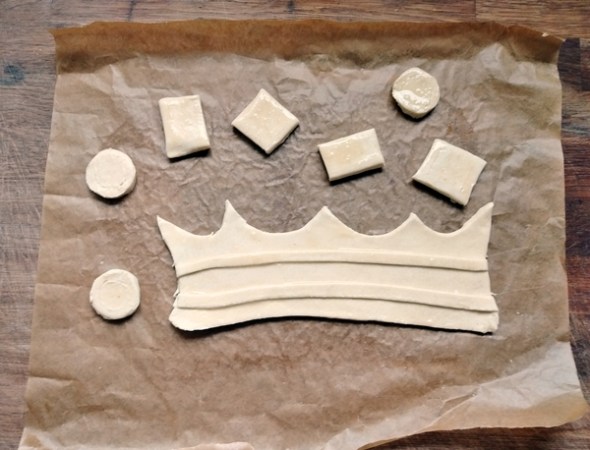
Use the remaining puff pastry to cut out some decorations.
- Cut out simple shapes (circle, rectangle, square, etc) and then make cuts just inside the edges half-way though the pastry, to make miniature vol au vent cases. Once cooked, the middles of these shapes can be removed. NB Make more than you need in case of breakages.
- Roll the remaining pastry thin and cut out a coronet. Add two bands of pastry for shape. This will rest lightly upon the raspberry filling, and so doesn’t need to be as puffed as the vol au vent shapes.
- Brush with beaten egg and bake for 20-25 minutes – being small, they don’t need as long as the tart shell.

- Cool on a wire rack.
Assembling the tart
 Begin by spreading a thin layer of seedless raspberry jam (above left) onto the base of the tart. This will act as a barrier to help keep the pastry crisp, and also as a nice contrast to the richness of the white chocolate Namelaka.
- Next spoon/spread/pipe a layer of Namelaka on top of the jam (above right). You can be generous, as this is the only decadent element to this dessert.
 Arrange your berries on top of the Namelaka. Pack them close together, so the cream is completely hidden.
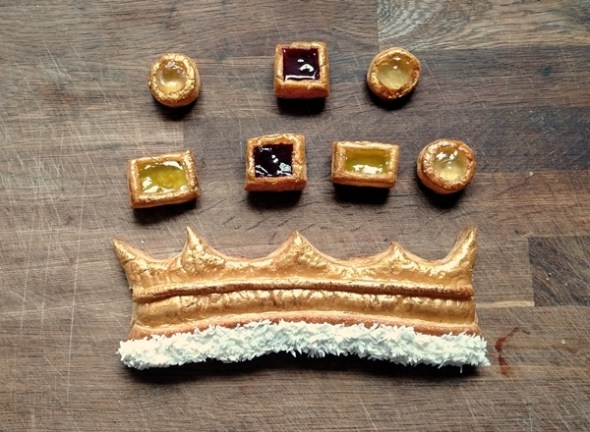 Embellish your decorations. To illustrate a different approach to the full-on, bells and whistles of the top picture, for this version I’ve not done any royal icing, just lightly brushed the pastry with a little gold food colouring. The mini vol au vents have been filled with various jams and jellies. To imitate the ermine fur at the base of the crown, I spead a little Namelaka on the bottom of the coronet and dipped the edge into some dessicated coconut.
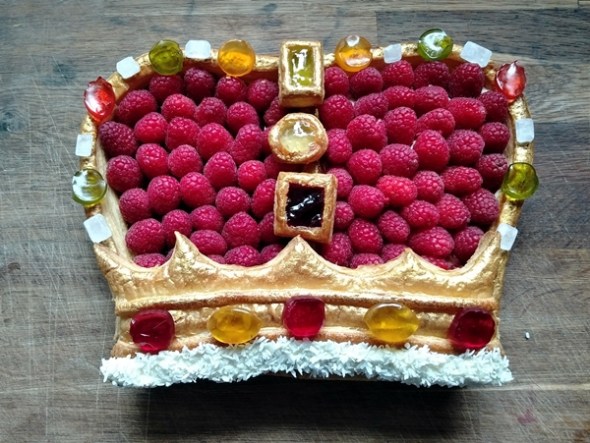 Lay on your decorations. This simplified Jubilee Tart has been finished with shiny gummy sweet jewels and rock sugar crystals.
Enjoy your Jubilee Tart!

I think the Queen would be most disappointed not to have had this tasty creation for dessert. Love it!
Wotchers Elaine!
Thank you for stopping by with such kind words!
Happy baking!
MAB 😀
Absolutely brilliant! A true show stopper!
I did it! True confessions- I made your Crown because of its show-stopping visual. I didn’t even care if it tasted good (!) for this occasion – but it was also DELICIOUS! Omg so good. And so many compliments! The tray was cleared. I struggled with the 2cm ridges of puff pastry baking up very tall and falling over every direction. I tried supporting the height to no avail. (Not sure what I missed there…) I trimmed the ridges down, re eggwashed the newly revealed puff pastry top and baked again for colour. I also ran out of puff pastry, so I did a recipe of sugar cookies and baked them to the same shade as the puff pastry. It was worth it all. So my crown shell was about as deep as a raspberry- was yours really deep to contain loads of namelaka? That might be even better. (Rapturous sigh…)
Thank you for the incredible inspiration. Id love to show you. MAB please comment if you have any advice- I think I will use this again as a template for other stunningly visual desserts!
Wotchers cal16605!
Thank you so much for taking the time to swing by and leave a comment.
I’m so glad that you enjoyed the tart and that it went down well at your ‘do’.
I’m sorry to hear about the wobbly walls. I’ve gone back over the post and re-read it to see if there’s anything missing in the instructions.
Did you chill the puff pastry for a full 30 minutes after rolling, and another 30 minutes after constructing the ‘walls’? This helps avoid shrinkage of the pastry after being handled. If you definitely did this, then I would suggest putting the pastry in the freezer instead of the fridge, to ensure it has firmed up.
I have also added a bit to the post about moistening the top of the first puff pastry layer to ensure the second layer sticks well.
The only other piece of advice I can think of is that you ensure your strips of pastry are a) all the same width, and b) sit exactly on top of one another to reduce the risk of them toppling over.
I hope this is of help.
I would love to see a picture if you have one online!
Happy baking! MAB 😀